

How To Create Cloudformation Template From Existing Resources
Looking to import manually created (existing) AWS resource into your SAM or CDK project (with CloudFormation) ? This is the video for you.
Often many developers offset learning AWS by manually creating resources in the panel. One matter leads to another and we end up launching full blown services by manually creating resource.
Fast forward 6 months and we acquire virtually CloudFormation, a powerful Infrastructure every bit lawmaking toolkit that allows you to define your AWS using template files (or code if using CDK).
It turns out, using tools similar SAM or CDK are the preferred ways of defining resources in AWS for whatsoever serious programmer. It isn't long when we try to switch over to using the 'right' approach.
Now we run into a problem – nosotros now need to integrate those existing AWS resources into our project so nosotros can start managing them using lawmaking. It turns out there's no 'suggested' way to practise this via AWS documentation, only there are some tricks you can follow to integrate these resources into your CloudFormation stack, and subsequently your SAM or CDK project.
In this article, I'll show you an example of how to migrate a DynamoDB table into a SAM based project.
Now lets figure out how its done.
Starting State
Our starting state is a CloudFormation stack called cf-import-demo. Currently, the only AWS resource that it manages is an SNS topic.
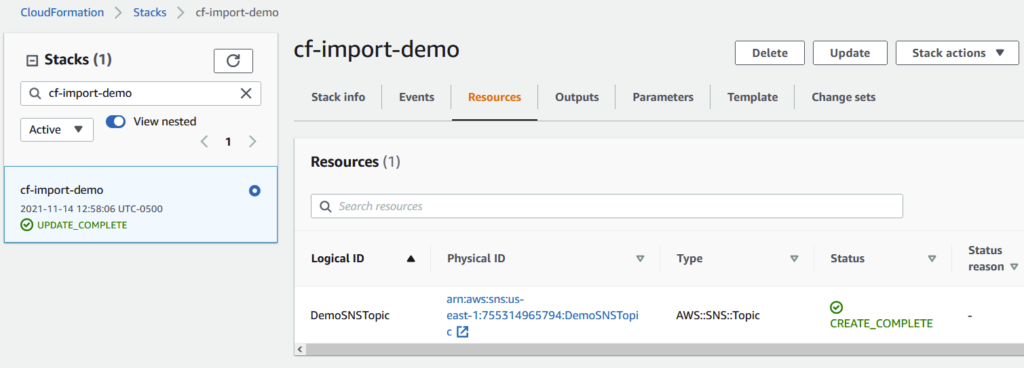
This stack was setup using the SAM toolkit and running the sam init command and selecting the Howdy Globe option. All boilerplate has been stripped out leaving us with a bare bones template.yaml file.
AWSTemplateFormatVersion: '2010-09-09' Description: > cf-import-demo Sample SAM Template for cf-import-demo Resources: DemoSNSTopic: Type: AWS::SNS::Topic Backdrop: TopicName: DemoSNSTopic Now here'south our DynamoDB table called TableToImport that was created manually in the console. This is our target for importing into CloudFormation.
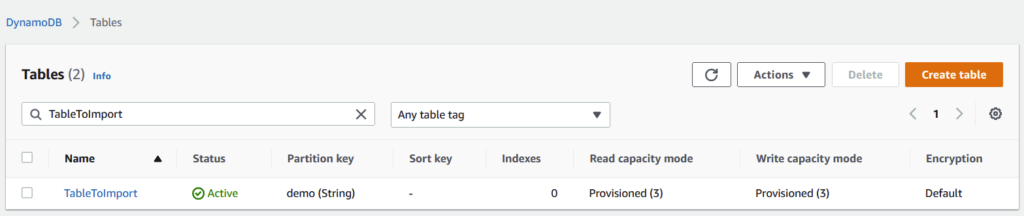
Notation that I've made almost zero modifications to this tabular array – the just configuration to notation is the ProvisionedReadCapacity and ProvisionedWriteCapacity which are currently set to i. Remember this for after.
Our end state will be our CF stack having control over our DynamoDB Table.
Then lets go into the how.
Step 1 – Modify Our tempate.yaml File
Our get-go pace is to brand some modifications to our template.yaml file in our SAM project file.
What we need to practice is finer create a CloudFormation resource that mimics the configuration nosotros accept specific on our manually created DynamoDB tabular array.
Nosotros need to define an exact lucifer (or every bit close equally possible match) to this entry. This ways manually looking through the configuration on your table, and looking upwards CloudFormation documentation to add the corresponding settings.
For example, in my manually created TableToImport table, the options that I've configured are a) Partition Key on the table, and b) read and write capacity. This means in my corresponding entry into my template.yaml file, I'll have to specify my Partition primal and capacity values.
Here'due south what the respective DynamoDB resource looks like:
TableToImport: Type: AWS::DynamoDB::Table DeletionPolicy: Retain Properties: TableName: TableToImport AttributeDefinitions: - AttributeName: "demo" AttributeType: "Due south" KeySchema: - AttributeName: "demo" KeyType: "HASH" ProvisionedThroughput: ReadCapacityUnits: "1" WriteCapacityUnits: "1" We'll suspend the resources to our template.yaml file alongside our SNS topic.
Now we take a modified CloudFormation file that contains our shortly to be imported resources. We at present need to link the resource with our CloudFormaiton stack. To practise this, nosotros go to AWS console.
Our final template.yaml file looks like this:
AWSTemplateFormatVersion: '2010-09-09' Clarification: > cf-import-demo Sample SAM Template for cf-import-demo Resources: DemoSNSTopic: Type: AWS::SNS::Topic Properties: TopicName: DemoSNSTopic TableToImport: Blazon: AWS::DynamoDB::Table DeletionPolicy: Retain Properties: TableName: TableToImport AttributeDefinitions: - AttributeName: "demo" AttributeType: "Due south" KeySchema: - AttributeName: "demo" KeyType: "HASH" ProvisionedThroughput: ReadCapacityUnits: "1" WriteCapacityUnits: "1" Note that if using SAM + Serverless, you'll need to remove the Serverless::Transform resource from the header of your generated template.yaml file. Not doing and so volition crusade the adjacent pace to fail at the upload step.
Another important notation is the DeletionPolicy: Retain component of our DynamoDB Table resources. THIS IS A REQUIRED ATTRIBUTE THAT YOU MUST SET. Again, failure to set this option on all resources that you are trying to port over will result in an error at the next step.
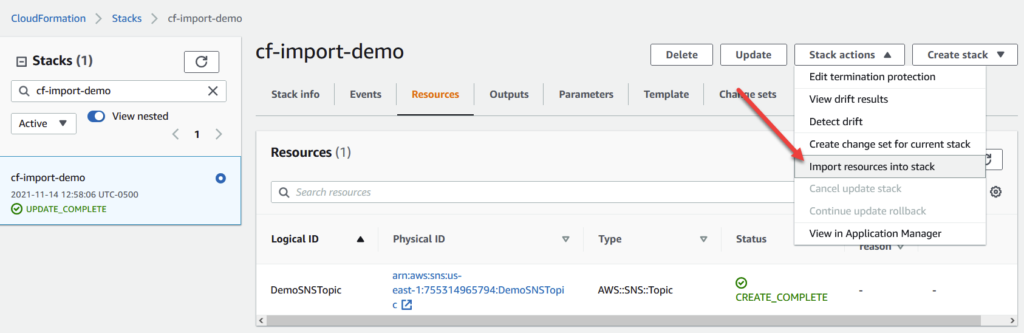
Step 2 – Link Our Resource to CloudFormation
We need to head over into the CloudFormation section of the AWS console and click on our Stack. From hither, we select the Stack Actions carte and click Import resources into stack.
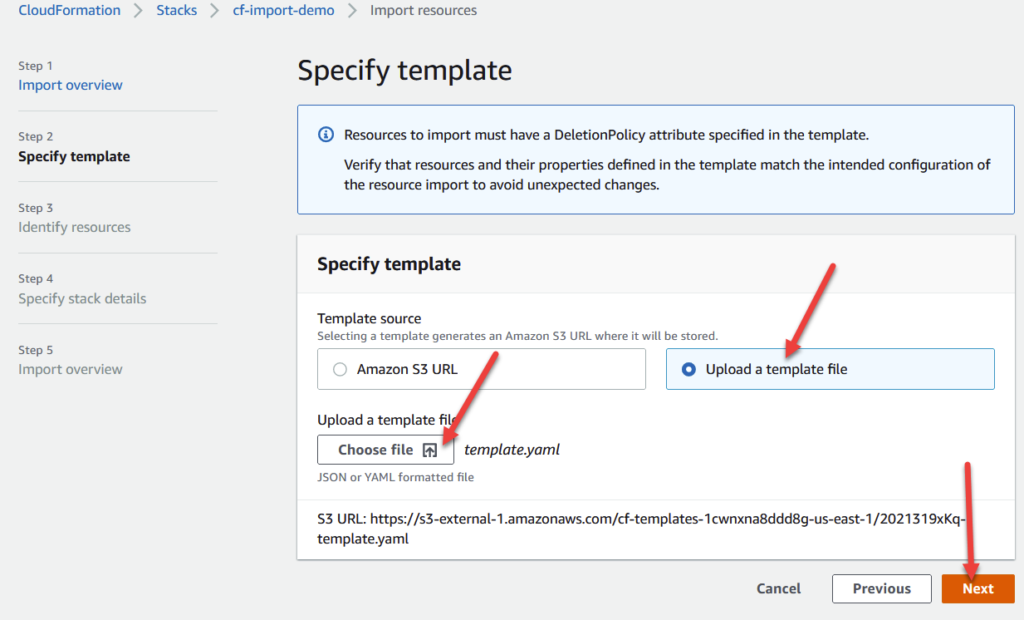
template.yaml file into our existing CloudFormation stack. Clicking it will launch a Sorcerer that guides you through the import process. What we need to do in this pace is upload our newly created template.yaml file into the wizard. This will give CloudFormation the power perform a diff betwixt what it thinks your stack is equanimous of, and what resource you've attempted to add together.
Information technology will automatically recognize the diff and import the existing resource into your electric current stack.
To go along moving forward, go the second step of the wizard and upload the updated file and click side by side.
template.yaml file into CloudFormation. Side by side, requite your imported resource a logical ID to refer to belatedly. I just name this the same name equally my resource, in this case TableToImport.
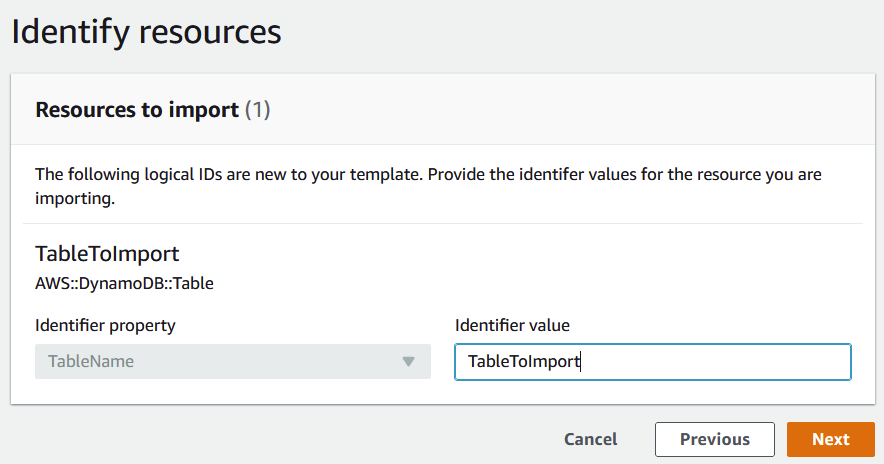
Y'all tin can effectively skip to the overview part of the sorcerer (unless y'all want to specify any additional parameters). CloudFormation will perform a unequal of your template file and what it has on record and let yous preview the resources it is about to import.
Earlier you continue with the adjacent step, Delight make sure to test out this procedure on your beta/test/development surround. Although this procedure is straightforward yous want to be sure information technology is working correctly in safe environment before performing these steps in production.
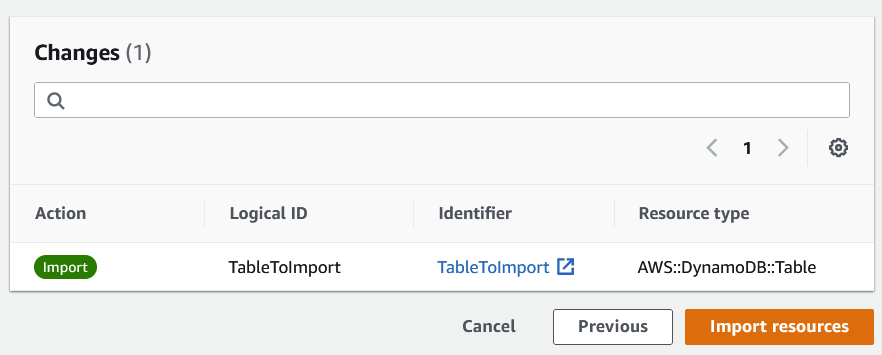
If you're satisfied, you can go ahead and click on Import Resource to perform the link.
If all went well, you lot should be forwarded to the Events department of the stack, and should see an update stream and hopefully IMPORT Complete as the terminal update.
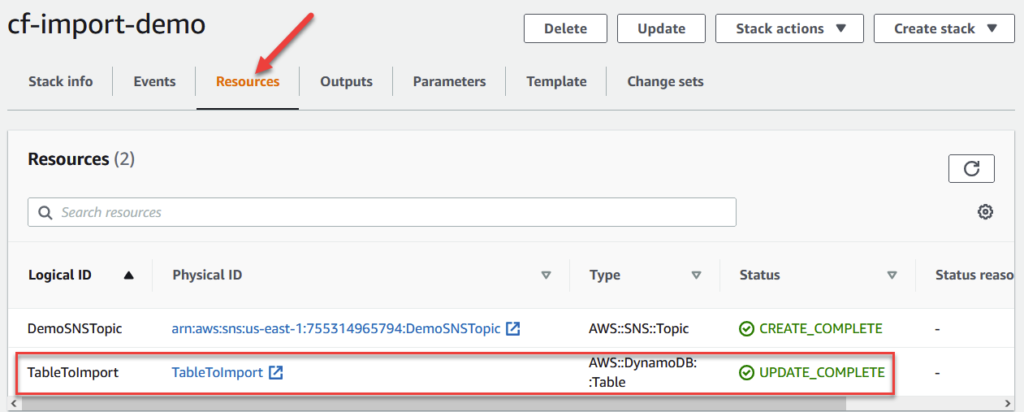
Nosotros can go to the Resources tab and should see our newly linked DynamoDB table!
Before we claim success, lets become back to our editor and make some updates to our imported resource. If all worked correctly, we should encounter corresponding updates to our cloudformation stack and DynamoDB tabular array.
Footstep iii – Test Information technology Out
To run across if the our setup is working, I'thou going to modify a trivial value as part of the ProvisionedThroughput option. Originally, nosotros set this value to 1. I'm going to change it to 2 and run across if the update occurs.
ProvisionedThroughput: ReadCapacityUnits: "ii" WriteCapacityUnits: "2" Subsequently making the change and saving our work, we run sam build and sam deploy to deploy our changes. We're greeted with a confirmation step asking u.s.a. to brand sure nosotros desire to deploy the modify.
Notice that the prompt is showing that we are modifying our DynamoDB table.

Confirming the prompt causes SAM to perform the alter. After its done, we go to the DynamoDB section to see if our Table has been changed correctly.
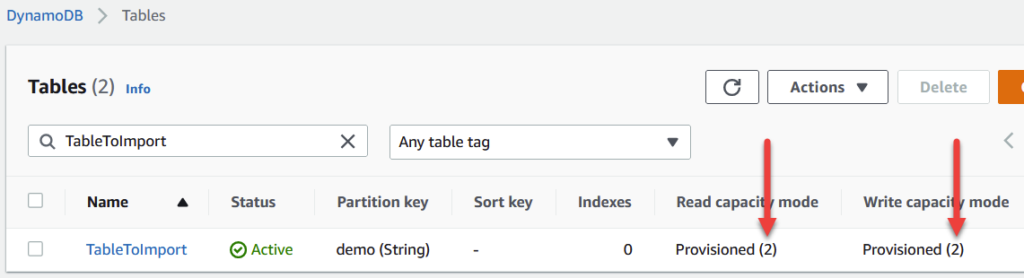
Bam! Our new modify is now showing up on our resource.
I hope you establish this article useful on migrating your resources into CloudFormation/SAM. If you accept any questions or comments feel free to write me below.

How To Create Cloudformation Template From Existing Resources,
Source: https://www.beabetterdev.com/2021/11/15/how-to-import-existing-aws-resources-into-cloudformation/
Posted by: musgroveansenuter.blogspot.com
0 Response to "How To Create Cloudformation Template From Existing Resources"
Post a Comment